以前、MT4 のお勧め WYSIWYG エディタ TinyMCE-MTPluginというエントリでも紹介した TinyMCE ですが、元々は WYSIWYG(なんかボタンが沢山あってワープロ感覚でHTMLを編集できるやつ)エディタ用の汎用スクリプトなので、Movable Type 等の CMS だけでなく、当然自作のフォームにも導入することができます。
というわけで、今回は自作のフォームに TinyMCE を導入して、WYSIWYG エディタにする方法の解説です。
TinyMCE のソースをダウンロードする
TinyMCEのサイトで、本体のソースをダウンロードしましょう。
ダウンロードページから、最新の Main package をダウンロードすれば良いと思います。
圧縮ファイルを解答すると、「examples」「jscripts」というディレクトリが出てきます。
これをまとめて、WYSIWYG のフォームを設置したいところへアップロード。
フォームページを用意する
texrarea 要素のあるフォームhtml を用意します。
その html 内に、TinyMCE を呼び出す JavaScript を記述してください。
以下、サンプルソースです。
<?xml version="1.0" encoding="UTF-8"?>
<!DOCTYPE html PUBLIC "-//W3C//DTD XHTML 1.0 Transitional//EN" "http://www.w3.org/TR/xhtml1/DTD/xhtml1-transitional.dtd">
<html xmlns="http://www.w3.org/1999/xhtml" xml:lang="ja" lang="ja">
<head>
<meta http-equiv="content-type" content="text/html; charset=UTF-8" />
<meta http-equiv="content-script-type" content="text/javascript;charset=UTF-8" />
<title>WYSIWYGエディタ</title>
<!-- 下記の行の src 属性は、TinyMCE をアップしたディレクトリを指定 -->
<script language="javascript" type="text/javascript" src="./jscripts/tiny_mce/tiny_mce.js"></script>
<script language="javascript" type="text/javascript">
tinyMCE.init({
	mode : "textareas",
	theme : "advanced",
	plugins : "safari,spellchecker,pagebreak,style,layer,table,save,advhr,advimage,advlink,emotions,iespell,inlinepopups,insertdatetime,preview,media,searchreplace,print,contextmenu,paste,directionality,fullscreen,noneditable,visualchars,nonbreaking,xhtmlxtras,template,imagemanager,filemanager",

	theme_advanced_buttons1 : "save,newdocument,|,bold,italic,underline,strikethrough,|,justifyleft,justifycenter,justifyright,justifyfull,|,styleselect,formatselect,fontselect,fontsizeselect",
	theme_advanced_buttons2 : "cut,copy,paste,pastetext,pasteword,|,search,replace,|,bullist,numlist,|,outdent,indent,blockquote,|,undo,redo,|,link,unlink,anchor,image,cleanup,help,code,|,insertdate,inserttime,preview,|,forecolor,backcolor",
	theme_advanced_buttons3 : "tablecontrols,|,hr,removeformat,visualaid,|,sub,sup,|,charmap,emotions,iespell,media,advhr,|,print,|,ltr,rtl,|,fullscreen",
	theme_advanced_buttons4 : "insertlayer,moveforward,movebackward,absolute,|,styleprops,spellchecker,|,cite,abbr,acronym,del,ins,attribs,|,visualchars,nonbreaking,template,blockquote,pagebreak,|,insertfile,insertimage",
	theme_advanced_toolbar_location : "top",
	theme_advanced_toolbar_align : "left",
	theme_advanced_statusbar_location : "bottom",
	theme_advanced_resizing : true,

	// WYSIWYGエディタに適用する CSSファイルを指定する
	content_css : "styles.css",
});
</script>


</head>

<body>

<form method="post" action="wysiwyg.cgi">
  <!-- 以下のテキストエリアが WYSIWYG になる -->
  <textarea name="textbody" cols="100" rows="15"></textarea><br />
  <input type="submit" value="投稿" />
</form>

</body>
</html>
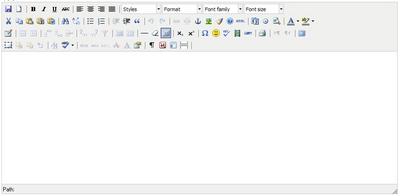
これで、以下のような WYSIWYG エディタが表示されるはずです。
